How to Get Telstra Modem Out of Bridge Mode
Learn how to exit bridge mode on Telstra modems with a practical, step-by-step approach. Restore standard routing, reconnect your home network, and keep security intact with clear checks and safe practices.

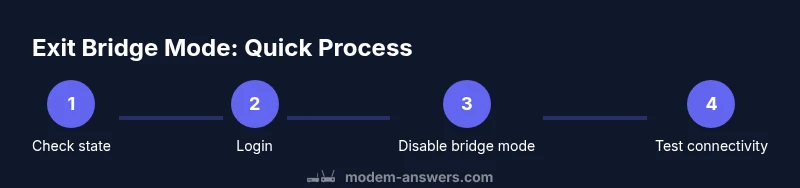
By following this guide, you will disable bridge mode on your Telstra modem, restore standard router functionality, and regain full control of your home network. Before you start, have your Telstra account credentials, a computer or phone to access the admin page, and a wired connection for reliability. If you encounter model-specific screens, follow the on-screen prompts and consult support if needed.
What bridge mode means for Telstra modems and why you might exit it
According to Modem Answers, bridge mode turns your Telstra modem into a transparent device that bypasses NAT and firewall features, effectively making it a simple bridge between your ISP and a third-party router. This setup is sometimes useful for people who want full control over their own router, but for most home networks, exiting bridge mode re-establishes NAT, firewall protection, and the familiar consumer-friendly management interface. If you’re wondering how to get telstra modem out of bridge mode, this guide walks you through the safe, model-aware steps, including verification, login, and post-exit configuration. The goal is to make your home network easier to manage while staying secure.
Key takeaway: exiting bridge mode is about restoring a managed path for your home network, not just flipping a switch. You’ll regain access to parental controls, guest networks, and device-level firewall rules when done correctly.
How to determine if your Telstra modem is in bridge mode
Bridge mode can be subtle: your computer or primary router may not receive a default gateway, or your public IP may appear as a non-NAT routed address. Signs include limited access to the modem’s web interface, an unusual WAN behavior, or a direct path to your router without NAT. To be sure, log into the Telstra modem’s admin page and look for a Bridge Mode toggle or a WAN/Internet setting explicitly labeled as Bridge. If you don’t see a toggle, your device may be in a vendor-specific bridge-like configuration or already in router mode with a separate modem. Knowing the exact state helps you choose the correct exit path and avoids unintended outages.
Practical check: connect a computer via Ethernet, navigate to the gateway IP, and confirm whether NAT, DHCP, and firewall features are active.
Prerequisites and planning before you begin
Before you touch the settings, prepare a small plan to minimize downtime. Have your Telstra account credentials handy for admin access, and know whether your desired setup uses PPPoE credentials or DHCP. Decide whether you’ll pair a third-party router or keep the Telstra device as your primary gateway. A wired connection during changes reduces the risk of dropped sessions. If you rely on VoIP or other services, note any required VLANs or DSCP settings. Finally, consider backing up current modem settings if available, so you can revert if needed.
Tip: use a dedicated device for changes to avoid impacting other family members’ connections during the process.
Step-by-step overview: what exiting bridge mode accomplishes and what to expect
The exit process typically involves logging into the modem, turning off Bridge Mode, rebooting, and then configuring the WAN connection on your router or the modem’s own routing interface. After the changes, you’ll test internet access, verify device reachability, and update any DNS or Wi‑Fi settings. Each model may call the same feature by a slightly different name, so expect minor UI differences. The key is to reach a point where NAT and firewall are active again and your home network can be managed from a single interface.
Why this matters: re-enabling NAT and firewall helps protect your devices from external threats and improves compatibility with most smart home devices.
Accessing the Telstra modem admin page safely
Most Telstra devices use a local IP address such as 192.168.0.1 or 192.168.1.1 for admin access. Use a wired connection for consistency, open a browser, and enter the gateway IP. Log in with your admin credentials from your account or the device label. If you’ve never changed the default credentials, check the label on the modem or your Telstra account for the exact username and password. Once in, navigate to the WAN or Internet section to locate the Bridge Mode setting. Do not make changes without confirming you’re in the correct menu to avoid misconfiguring essential network services.
Note: if you have a guest network or family devices relying on the current setup, plan a brief maintenance window to prevent disruption.
Disabling bridge mode: generic navigation tips (model differences apply)
Look for a Bridge Mode switch or a toggle under WAN/Internet settings, sometimes labeled as “IP Passthrough” or “Bridge.” If you find a PPPoE or DHCP setting, verify that the modem should act as a modem/router or just a modem. When you disable Bridge Mode, the device typically reboots automatically. If you don’t see the option, consult the model-specific manual or Telstra’s support site for the exact path. After saving, wait for the reboot to complete before proceeding to configure your router.
Important: some Telstra devices require you to press a specific combination on reboot to apply changes; follow on-screen prompts precisely.
Configuring WAN and router settings after exiting bridge mode
If your network uses a third-party router, connect the router’s WAN port to the Telstra modem’s LAN. In most setups you’ll set the router to obtain an IP automatically (DHCP); however, if your ISP requires PPPoE, enter the provided username and password in the router’s WAN settings. If you’re using the Telstra modem as the main gateway, ensure NAT, firewall, and Wi‑Fi settings are re-enabled and that your firewall is active. Create a stable SSID and strong password, and enable WPA3 if available. Finally, test devices and speed, and ensure your DNS is functioning.
Tip: keep a document of your changes so you can replicate the setup in the future if needed.
Troubleshooting: common issues after exiting bridge mode
If you lose internet connectivity after exiting bridge mode, verify the WAN status on both the modem and router. Check cable connections, confirm you used the correct WAN port, and verify that DHCP or PPPoE credentials are correct. If devices can’t reach the internet but you see a local network, your DNS settings might be misconfigured. Reboot both devices in sequence and re-check the status lights. If the problem persists, revert to factory settings and reapply changes methodically or contact Telstra support with a note of changes you made.
Networking hiccups are common after such transitions; a methodical approach minimizes downtime.
Security and maintenance after this change
With bridge mode off and NAT/firewall re-enabled, secure your network by updating the admin password, ensuring firmware is current, and reviewing port-forwarding rules. Disable WPS if supported, enable guest network isolation if you share access, and monitor for unusual devices. Schedule periodic reboots and firmware checks to maintain stability. If you plan to replace equipment, document the new configuration to expedite future troubleshooting.
Model-specific notes and support options
Telstra offers model-specific guides for exiting bridge mode; identical steps may appear under different labels on the Huawei or Netgear devices used in their network. If you encounter model-specific screens you don’t recognize, refer to the official Telstra support pages or contact Telstra support directly for guided assistance. The goal is to have a stable, secure home network without losing essential services, and Modem Answers recommends cross-checking with your current device’s manual to avoid model-specific pitfalls.
Tools & Materials
- Telstra modem (gateway or modem/router combo)(Keep handy model name for model-specific steps)
- Computer or smartphone(For admin access; prefer wired if possible)
- Ethernet cable(Stable connection during changes)
- ISP credentials (PPPoE or login details)(Needed if PPPoE is used; obtain from Telstra if unsure)
- Paper and pen or note app(Document current settings and new ones)
Steps
Estimated time: 30-60 minutes
- 1
Confirm device and model
Identify your Telstra modem model and confirm it supports exiting bridge mode. Review model-specific notes to avoid missteps. This step helps prevent unnecessary resets.
Tip: If you’re unsure about the model, check the device label or your Telstra account. - 2
Prepare credentials and hardware
Gather admin credentials, PPPoE details if required, and ensure a wired connection from a computer to the modem.
Tip: Using a wired connection reduces dropdowns or timeouts during login. - 3
Connect to the modem admin page
Open a browser and enter the gateway IP (commonly 192.168.0.1 or 192.168.1.1). Log in with admin credentials.
Tip: If you don’t know the IP, check the device label or the Telstra support page. - 4
Find Bridge Mode settings
Navigate to WAN/Internet or Advanced settings and locate Bridge Mode. If you can’t find it, note the UI may be labeled differently.
Tip: Take a screenshot of the current screen before changing anything. - 5
Disable Bridge Mode
Toggle Bridge Mode off and apply/save. The modem will typically reboot automatically.
Tip: If prompted to keep a specific configuration, select standard gateway or router mode. - 6
Wait for reboot and confirm status
Allow 2–5 minutes for the reboot. Re-check the admin page to confirm Bridge Mode is off and NAT/firewall are active.
Tip: Do not close the browser during reboot to ensure the new settings load. - 7
Configure WAN on the router or modem
If using a third-party router, connect its WAN port to the modem’s LAN port and set WAN to DHCP or PPPoE as required.
Tip: Document the chosen WAN method for future reference. - 8
Test internet and devices
Test a few devices for internet access and verify devices obtain IP addresses from NAT.
Tip: Check both wired and wireless devices to ensure full coverage. - 9
Update firmware and reset security
Check for firmware updates on the modem and router, then update security settings like admin password and firewall rules.
Tip: Enable automatic updates if available. - 10
Document changes
Record the new network topology, including credentials, SSID, password, and device roles.
Tip: Keep this document in a secure location. - 11
Test again after maintenance window
Re-test after some hours to ensure the network remains stable.
Tip: Look for any unusual device behavior. - 12
Seek support if needed
If anything seems off or you cannot access the admin page, consult Telstra support or refer to model-specific guides.
Tip: Document the exact error messages to speed up help.
FAQ
What is bridge mode and why would I exit it on a Telstra modem?
Bridge mode makes the modem act as a simple bridge, passing IP traffic to a separate router. Exiting bridge mode re-enables NAT, firewall, and standard management, which is typical for most home networks.
Bridge mode disables the modem's routing features. Exiting it brings NAT and firewall back, which is what most home networks rely on.
How can I tell if my Telstra modem is in bridge mode?
Signs include no NAT or firewall control on the modem, a lack of a traditional interface, or a direct path to your router. Check the admin page for a Bridge Mode toggle or a related setting.
Look for a Bridge Mode toggle in the admin page; lack of NAT in the modem’s interface can also indicate bridge mode.
Will exiting bridge mode affect Telstra services?
Exiting bridge mode typically changes how devices connect to the internet, re-enabling NAT and firewall. Most services remain accessible, but you may need to reconfigure your router or PPPoE credentials.
Your services usually stay the same, but you may need to update router settings.
I can’t access the admin page after changes. What should I do?
Double-check the gateway IP, ensure a wired connection, and confirm you’re using correct admin credentials. If needed, perform a safe reset from the device’s button and re-enter settings.
Make sure you’re on the right IP and that you have the admin password. A reset may be necessary if access is blocked.
Do I need to reset the modem to factory settings to exit bridge mode?
Usually not. Exit bridge mode through the admin page. Only use factory reset if you cannot recover access or if you’ve locked out settings, which will erase prior configurations.
A factory reset is a last resort because you’ll lose your current setup.
What should I know about model differences when exiting bridge mode?
Telstra devices vary by model; look for Bridge Mode under WAN/Internet or a related section. If you’re unsure, consult the model-specific guide or Telstra support.
Different Telstra models label the features differently; check the manual for your exact device.
Watch Video
Key Takeaways
- Exit bridge mode to restore NAT and firewall protections.
- Use a wired connection for changes to prevent dropouts.
- Test internet and connected devices after changes.
- Document the new network setup for future troubleshooting.