How to Install a Modem Without Coax Cable
Learn how to install a modem without coax by using Ethernet-based services like fiber or DSL. Step-by-step guidance, tools, and safety tips for homeowners and renters.

With Ethernet-based internet, you can set up your home network without coax by connecting a router to a fiber ONT or a DSL gateway. This guide helps you identify your service type, choose compatible equipment, and complete activation. Expect a typical setup to take 30–90 minutes, depending on provider activation steps and your home layout.
Understanding what 'without coax' means for internet setup
To many readers, the phrase without coax might sound restrictive. In modern homes, internet termination often happens at Ethernet-based devices, not coaxial cables. According to Modem Answers, many households now rely on fiber or fixed wireless services that terminate at an Ethernet output, or an optical network terminal (ONT), rather than a DOCSIS coax connection. That shift changes what you buy: instead of a traditional cable modem, you might use a gateway or a separate router connected to the ONT. Understanding this difference upfront saves you time and money, because you can focus on Ethernet cabling quality, router configuration, and ISP activation steps rather than coax routing in walls. This approach is especially relevant in 2026 as home networks become more standardized around wired Ethernet for reliability and speed.
Service types that can skip coax
If you do not have coax, your service is most likely fiber, DSL, or fixed wireless. Fiber service places equipment at the home that outputs Ethernet to your router, while DSL uses a copper line to a gateway or modem with an integrated router. Fixed wireless provides a similar Ethernet output from a wireless modem that connects to the provider’s network. In every case, the critical setup step is connecting your router to the Ethernet output rather than a coaxial modem. This approach minimizes signal loss, improves stability, and makes network management simpler for typical home layouts.
What you need to verify before starting
Before you touch any devices, verify your service type with your Internet service provider or through your account portal. Look for terms like ONT, fiber gateway, Ethernet handoff, or DSL modem in your documentation. Confirm whether you are allowed to BYO router or if the ISP requires their equipment. Ensure you have a working Ethernet path from the termination point to where you want your router placed, and check that your elevation, ventilation, and proximity to power outlets won’t create heat or tripping hazards. According to Modem Answers, knowing the exact termination method saves you from buying the wrong gear and speeds activation.
Step-by-step fiber/ONT-based setup (no coax)
For fiber or Ethernet-based services, the common workflow is to connect your router to the ONT or provider gateway via Ethernet. First, locate the ONT or gateway; it should have an Ethernet output labeled WAN or LAN. Connect an Ethernet cable from the ONT’s Ethernet port to your router’s WAN port. Ensure both devices are powered on, then wait 1–2 minutes for the router to boot. Access the router’s admin interface using a web browser or app and follow the ISP activation prompts or your own network setup wizard. If your ISP requires activation, you will see a provisioning message or a browser landing page. After activation, you can enable DHCP, set a strong Wi‑Fi password, and customize your SSID. For better security, consider enabling WPA3 on devices that support it. If you encounter issues, restart both the ONT and the router, re-check cables, and verify LED indicators for connectivity status.
Step-by-step DSL/other non-coax setups (where applicable)
DSL and other Ethernet-presented services also avoid coax cables. Begin by confirming the DSL modem or gateway is connected to a living space with a direct copper line from the service provider. Connect the DSL modem’s Ethernet output to your router’s WAN port. Power on the modem first, wait for stabilization, then power on the router. Access the router’s admin page to confirm the WAN status and run any activation prompts from the ISP. If you use a separate modem, ensure it’s configured to bridge mode if you want your own router to handle routing. Always verify with your ISP that you can BYO router and follow their activation guidance to finalize service.
Troubleshooting and common mistakes
If you’re not seeing a device online, start by checking the cable quality and the proximity of devices to power outlets. Ensure you use a standard Ethernet cable (Cat5e or higher) and avoid overly long or damaged runs. Confirm you’re connected to the correct WAN/ETH port on the router and that the ONT or gateway is powered and showing a solid connection light. Do not attempt to use adapters that convert coax to Ethernet; such devices cannot substitute the service termination point. Remember to secure your Wi‑Fi after setup and test both wired and wireless speeds to confirm performance aligns with your plan. Finally, review the ISP activation steps if provisioning appears delayed and reach out to support when needed.
AUTHORITY SOURCES
For authoritative guidance on how to implement Ethernet-based internet terminations, consult official resources and industry best practices. The following sources provide foundational information about ONTs, fiber terminations, and secure home networking:
- https://www.fcc.gov
- https://www.nist.gov
- https://www.consumer.ftc.gov
Tools & Materials
- Ethernet cable (Cat5e or higher)(At least 1-2 meters; use shielded if interference is a concern)
- ONT or provider gateway (Ethernet output)(Provided by your ISP for fiber; connect to router via Ethernet)
- Router with Ethernet WAN port(Device that handles local network; ensure it supports current Wi‑Fi standards)
- Power strip or surge protector(Prefer a dedicated outlet for each device or a small surge-protected power strip)
- DSL modem or gateway (if required by service)(Include only if your service specifically requires a separate DSL modem)
- Account information for activation(Have your ISP account number and service address handy)
Steps
Estimated time: 45-90 minutes
- 1
Identify your service type
Confirm whether your home uses fiber ONT, DSL gateway, or another Ethernet handoff. Review the installation paperwork or contact your ISP to confirm the termination method. This step ensures you purchase the right equipment and avoid unnecessary coax work.
Tip: Have your account number and service address ready when calling to speed verification. - 2
Gather compatible equipment
Collect an Ethernet cable, your router, and the ONT or gateway provided by the ISP. If your service uses a separate DSL modem, locate it and verify that it is compatible with your router. Prepare a clean, ventilated space near a power outlet for placement.
Tip: Label cables to prevent confusion between the ONT/gateway and the router. - 3
Power down and prepare the termination point
Power off all devices before connecting. Ensure the ONT or gateway is stationary and within reach of a power outlet. Remove any cable tangles and choose a short, direct Ethernet path to minimize latency and interference.
Tip: Avoid routing Ethernet near heavy power cables to reduce interference. - 4
Connect the ONT/gateway to the router
Plug one end of the Ethernet cable into the ONT/gateway Ethernet port and the other end into the router’s WAN port. Power on the ONT/gateway first, then power on the router. This sequencing helps the router obtain a valid network address during activation.
Tip: If your ISP requires activation via a portal, prepare the activation steps before powering on. - 5
Activate and configure your network
Access the router’s admin interface with a computer connected to the network. Follow the ISP prompts or use the setup wizard to configure DHCP and security settings. Give your network a unique name and a strong password, and enable WPA3 if available.
Tip: Change default admin credentials immediately to improve security. - 6
Test performance and secure the setup
Run wired and wireless speed tests to verify service levels. Confirm devices can access the internet, streaming works smoothly, and online security features are active. Document the network details for future troubleshooting and future upgrades.
Tip: Test with multiple devices to ensure consistent performance across the network.
FAQ
Can I use a traditional cable modem without coax?
No. A DOCSIS cable modem requires a coax connection. For fiber or DSL, use a gateway/ONT and connect your router via Ethernet.
No—cable modems need coax. For fiber or DSL, you’ll use an ONT or gateway and connect your router with Ethernet.
Do I need a separate modem for fiber or DSL?
Often fiber or DSL setups use a gateway or an integrated ONT; you may not need a separate modem unless your ISP specifies one.
Usually fiber or DSL uses a gateway or ONT; a separate modem is not always required.
How long does activation take after wiring?
Activation time varies by provider, but you can usually expect a short provisioning period after you power up and connect the equipment.
Activation can take a little while after setup; follow the provider’s prompts.
How should I secure my new network?
Change the default admin password, give your Wi-Fi a strong, unique password, and enable the latest security standard supported by your router.
Make sure your Wi‑Fi is protected with a strong password.
Do I need to place the ONT near a power outlet?
Yes. The ONT requires power and should be placed within reach of a power outlet with adequate ventilation.
Keep the ONT near a power outlet and in a ventilated spot.
What if I want bridge mode?
Bridge mode is optional and typically used to bypass router features when you want a third-party router to handle routing. Check with your ISP before enabling it.
Bridge mode is optional; check with your ISP first.
Watch Video
Key Takeaways
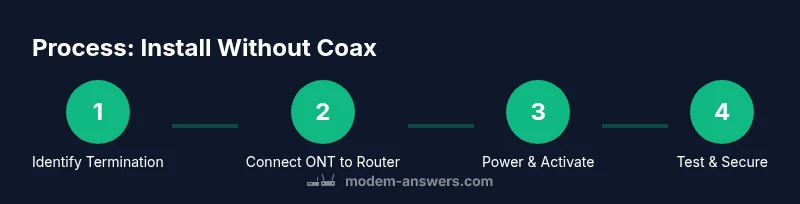
- Ethernet-based internet avoids coax entirely
- Identify service type before buying gear
- Connect ONT/gateway to router with Ethernet
- Activate service with ISP and test speed
- Secure Wi-Fi with a strong password